5 Tips for Improving Casting Accuracy

Let’s face it, the more time your fly spends “in the zone” the more likely a fish will eat it! Each method of fly fishing, be it nymphing, dry fly fishing, or streamer fishing, is more successful when you can consistently hit your target. There are very few occasions where being in the trees is the desired outcome, but beyond that each method has its own particular issues that arise from failing to put your fly where you want it.

My buddy Domenick over at Troutbitten always does a great job of emphasizing (reminding me) to put the nymph rig “all in the same current.” Whether it is a single nymph, multiple nymphs, or nymphs and a suspender, having parts of your rig in different currents will lead to drag. Fish often won’t tolerate drag on food they expect to be drifting freely in the current.  Be accurate with your placement of where your leader and flies land and enter the water. Set up the drift before the rig enters the flow and your fly will get deeper quicker and reduce the time you spend needing to mend.

Use the net2.jpg
Betz-man admiring the results of an accurate cast. (And good drift)

Dry Flies are where accuracy can really make or break your game. Fish that are elevated in the column feeding just below the surface have a reduced field of vision. If we think of the fish’s view as a cone, the greater the distance they are from the surface, the greater their view area. When fish are deep, it can provide protection, but it requires more energy to come up through the current and pick a bug off the surface. Small fish often can’t afford the vulnerability of sitting just below the surface to feed and they are often the ones rising faster from the river bottom and creating splashier rises. The fish we want to catch are sitting just under the surface letting the forage drift to them. Efficient, right? That means they are less likely to move very far for your offering because it’s out of their field of vision. If you want to use the net, get your fly in the lane they are feeding in.

Use the net
Get it in the zone.  Use the net.

Accuracy is hugely important with streamers, as well. Casting accurately can set you up to retrieve your fly through the correct holding or feeding water depending on what the fish are doing. As with any form of fly fishing, it’s important to try not to cast across multiple currents. It’s a total misconception that streamer fishing is blindly casting at the bank and pulling your flies back. Be deliberate and target the lies where the fish are and be aware of what is between you and your target. Avoid the conflicting currents that will result in slack. Covering water is one thing, but do so intelligently and with a plan. Pick a target, hit it, and get that fly moving.

Use the net4
The Streamer King knows where that fly belongs and gets it there consistently.

So, how about those 5 tips for casting more accurately?

LOOK at Your TARGET

It’s an easy concept in theory, but on the water there are countless ways to lose focus on our actual target. I love to share the Delaware River system with folks for their first time. This spring we were working our way down the river, looking for heads breaking the surface. “Oh, there’s a fish! Ten feet off the bank, he’s really coming up! Oh! No, that’s two fish! They are coming up one after the other,” the angler said as he shuttered with anticipation. I shook my head and chuckled to myself before explaining, “Nope, that’s one fish. That second thing you are seeing come up is his tail. Yes, he really is that big.”

When casting to rising fish like this, we want to land the fly upstream of the fish so it can drift down through their feeding lane. The distance above the fish that we need to target depends on the situation. Honestly though, how do you focus on your target and NOT focus directly on that feeding fish? If you keep your eyes on the feeding fish, guess what happens next – we splat the cast on his head and put him down. First, find the fish you plan to cast to and make a plan. Then, pick your target and look at it while you are casting.

Have a Strong Fundamental Cast

I previously wrote about The Five Essentials of Fly Casting. The first step to improving any facet of your casting is to have a strong grasp on the fundamentals and how to form our basic loops. The next step is understanding how you can change your cast to fit the situation you are faced with discussed in The Five Variables of Fly Casting. When you understand what HAS to happen to complete a successful cast, and you know what CAN VARY in a successful cast, you can fit your presentation to fit the puzzle in front of you.

Check Your Stance

Square up! The stance we start casting with is usually with feet shoulder width apart. Don’t start off balance. Once you are comfortable, you can alter your stance to improve accuracy. If you are looking to focus solely on accuracy, place your dominant foot (the same side as your casting arm) forward. Adjusting your stance this way will align your cast closer to your eye, like lining up to throw a dart. This is a difficult stance to be in to cast 80′, but it will help you when you try to keep the entire cast in the same plane.

Keep the Entire Cast in the Same Plane

While we’re talking about throwing a dart, have you ever done so side arm? Probably not accurately! Did you stand crooked and off to the side? No. If your target is directly in front of you, line everything up. Remember trigonometry and figuring angles into the equation? Not very well, right? Keep it simple. If you cast off to the side, you have to compensate for the angle created between your eye, your target and your rod tip. Avoid creating the angle by casting directly overhead. Straight lines whenever possible.

Your back cast should be 180 degrees away from your target and your forward cast will be right on the money. Place your thumb on top of the rod and point it away from the target on the back cast and directly toward the target on the forward cast. Stop your backcast about eye level, near your cheek. This will dial in your aim and make accurate casts much easier to make.

Practice!

These aren’t things to be figured out on the river. Take your nice presentation leader off of your fly line, tie on a stout 7 1/2′ leader and a piece of egg yarn for a fly and go throw some line in the yard. Set up targets and practice hitting them on the first try. Figure out what stance is most comfortable and how many false casts it takes you to get from fly in hand to 40′. Play around and get familiar with the over-engineered piece of graphite we use to unfold plastic coated string and drop fur and feathers in front of fish. It’s the Jedi, not the Lightsaber after all. Master your craft. Use the net. Thank me later.

pretty good
A pretty good fish… for Kris.

The Five Variables of Fly Casting

I previously wrote about the Five Essentials of Fly Casting. Over the last few years, I’ve spent countless hours working with our casting group in Warren, PA. In that time, we primarily practiced the Fundamentals of Casting, constructively critiqued one another, and worked on teaching casting to others. Learning and practicing the Five Essentials should be the first steps as a Fly Caster. Once you have a solid grasp on the fundamentals, you can begin to understand the next group of fly casting skills. Skills our fearless leader and Fly Fishers International Master Casting Instructor, Gary Kell refers to as Five Variables. While maintaining the Five Essentials, these Five Variables are practical changes we can make to our basic cast to create Fishing Casts. The Five Variables are:

  1. Loop Size
  2. Loop Speed
  3. Loop Plane
  4. Loop Trajectory
  5. Rod Mends


Loop Size

The Loop is the “U” shape created by our fly line outside of our rod tip. As we make a cast, the line forms two “legs,” the Rod Leg and the Fly Leg.Loop DefinitionsWe generally refer to the size of loop size as narrow (3 ft wide or less), medium (3 to 6 ft wide), and wide (6 to 8 ft wide or more), referring to the distance between the rod leg and fly leg.Loop SizeNarrow loops are the most efficient loops and are critical for casting in the wind, around obstacles, and casting for distance. As a fisherman however, medium and wide loops can be essential in the proper situations. When casting indicators and split shot or heavy sinking lines, gravity becomes the enemy of tight loops. The added weight can cause the fly leg to collapse and create infuriating tangles. I know well from past experience.

We can increase our loop size by increasing our casting arc for a particular length of line. This increase in casting arc creates the convex rod tip path (more circular) mentioned in the Five Essentials.

Beware, the shorter we can make our casting stroke for a length of line, the narrower our loops will be, to a point. If we use too short of a casting stroke for a length of line, we will end up with a tailing loop resulting in knots and tangles.


Loop Speed

We can vary our loop speed from slow, to moderate, to fast. Moderate would be considered a comfortable casting speed. Slower loops take less energy and can be helpful for more delicate presentations whereas, faster loops take more energy but can be helpful in windy conditions, to deliver a fly to a moving fish, or while your boat is moving quickly past your target.

An important thing to remember when varying loop speeds, the more force you apply to the rod, the more it bends the rod. Therefore, in order to maintain our loop shape, we have to make a few adjustments. If we cast faster loops, the more the rod bends, requiring a longer casting stroke and shorter pause. If we cast slower loops, the less the rod bends, requiring a shorter casting stroke and longer pause.

Varying Loop Speed
Slow Fast
Force Less Force More
Casting Arc Shorter Casting Arc Wider
Pause Longer Pause Shorter


Loop Plane

Our fundamental cast is typically made with a vertical loop plane. There are occasions where we need to  change the plane in which our rod travels and,  in turn, the plane our loops form. These casts are commonly referred to as a side-arm cast or a cross body cast. We can use these fishing casts when we encounter obstructions or when wind becomes a safety concern (for you or your pals). If we form our loops on the down-wind side of ourselves we can execute a safer cast. Safer, because the wind carries the loop and fly away from us instead of blowing them into us.

If you fail to execute a safe cast, here is a link for a video on how to safely remove a hook from skin. (It works. Yet again, I speak from past experience.)Varying Loop Plane
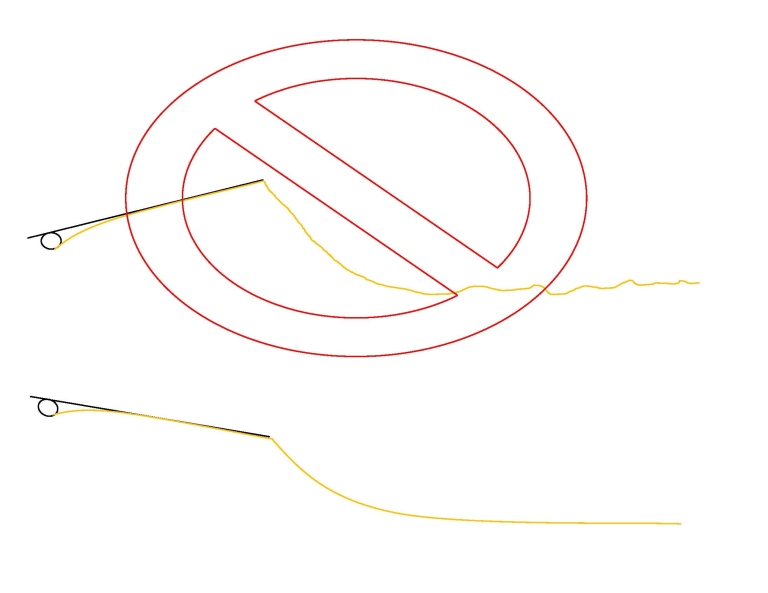
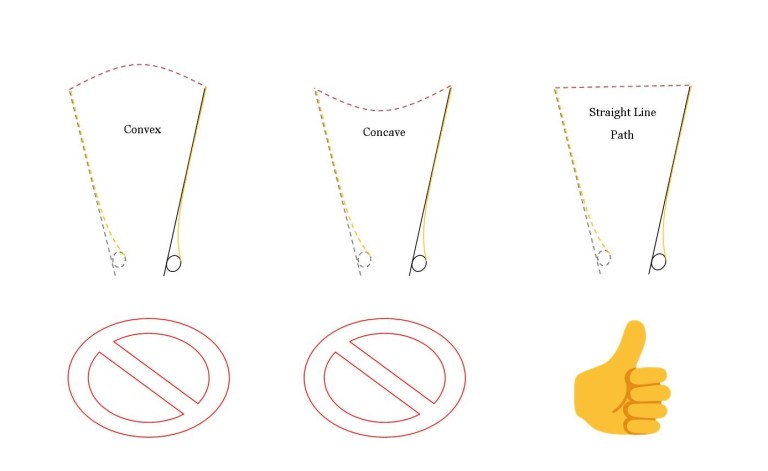
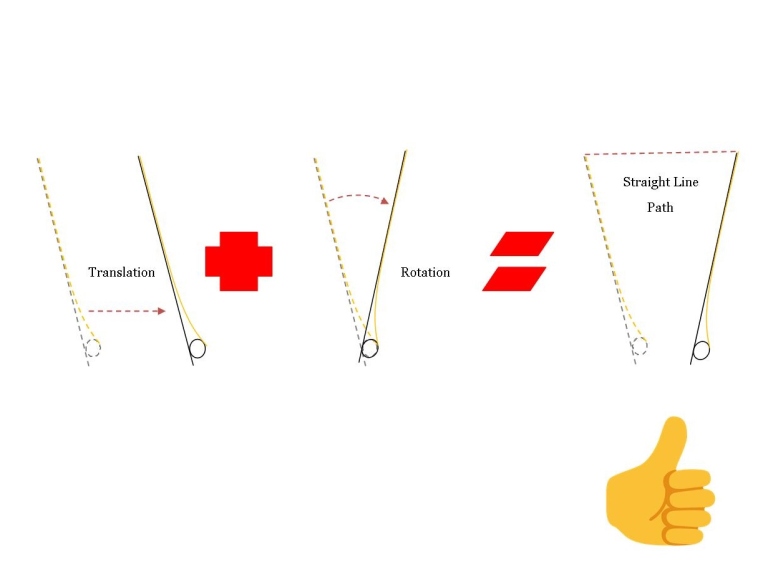
In these situations, our Five Fundamentals remain important. We want our rod tip to follow a straight line path. However, we tip the entire casting arc on its side. When we do this, gravity can again become our nemesis and drag our loops down. A good idea when casting on a horizontal plane is to increase our loop speed to avoid having your fly ticking the grass or slashing the water surface.


Loop Trajectory

Generally speaking, we cast our loops with horizontal trajectory, straight back and straight forward. We can vary the trajectory of our loops depending on the fishing situation. It is important to note, we need to maintain loops that are 180º from one another. If we cast upward in the front, our backcast needs to be tilted downward. If we cast downward in the front, our backcast needs to be titled upward.

When we are casting for accuracy, we want to cast with a downward trajectory toward our target. This eliminates the chance the wind can blow our line and fly off target. If we have overhead branches behind us we need to cast downward underneath them, and as a result, our forward cast must have an upward trajectory.

Trajectory of our loops is varied when we stop higher or lower on our casting stroke. For an upward trajectory, stop the rod higher in an ascending manner. To direct our cast downward, stop the rod lower in a descending path.

Varying Loop Trajectory


Rod Mends

The most important thing to remember with rod mends is that the fly line will follow the tip of the rod. Once we have stopped on our forward cast our fly line and fly are going to travel in the direction we’ve just sent it. After we stop, we can use the rod tip to influence what happens between our rod tip and the target.

When we are fishing artificial flies that imitate things that aren’t strong swimmers or are at the mercy of the current (insects, eggs, etc.), it is critical that our offering is free of drag and is floating along freely with the flow. Once the fly is on the water we can mend our flies to achieve a drag free drift. It is, however, much easier to manipulate fly line BEFORE things like current and surface tension start influencing our fly line. As mentioned above, we can manipulate the rod after we stop on our forward cast and our line is still in the air to perform what are referred to as aerial mends.

There are countless ways we can execute aerial mends, but probably the most common is the reach mend. As shown below, we move the rod from location 1 to location 2 in our basic casting stroke. Once we have stopped at location 2, we move the rod to location 3 as the line is traveling toward the target. By changing the angle between the rod tip and the target, we place controlled slack that will be a buffer between our fly and line under tension created from the current. Instead of having a direct connection to our fly and a line under tension, we have bought ourselves a few more seconds of drag free drift without risking pulling our fly under water with an on the water mend.

Rod Mends


The Five Variables are essential skills for those interested in using the fly cast as a tool to catch more fish. Once you have a strong foundation built upon the Five Essentials, practice these Five Variables. You’ll be surprised how much more enjoyable time on the water is when you can eliminate tangles and have the tools to catch those extra finicky fish.


The Five Essentials of Fly Casting

When making a successful fly cast, there are a ton of things that vary. With that in mind, we consider Five Essentials that remain true for all efficient casts regardless of a person’s casting style. The Five Essentials are considered fundamental basic building blocks for wide range of casts to meet the countless situations that come up while fly fishing. Put simply, we must:

  1. Eliminate Slack
  2. Accelerate Smoothly to a crisp stop
  3. Straight Line Path of the rod tip
  4. Casting Arc must vary with the amount of fly line
  5. Pause between back cast and forward cast

Eliminate Slack

Before we begin our cast, we need to be sure we have removed excess line outside the rod tip and have anchored the line. To anchor the line, we can use our rod hand by gripping the line against the cork or we can use the line hand (typically we use the thumb and forefinger on the hand not holding the rod).

If we start our casting stroke with a pile of line at our feet, we waste a portion of the casting arc removing slack. If there is no slack in the system, the fly will move as soon as the rod tip moves.

How do we remove slack? We can strip in excess line or roll cast our line into a better pick-up position. We want our rod tip pointing toward our fly line and fly.

Eliminate Slack

Accelerate Smoothly

This is how we apply power to the rod and use the mass of the fly line to load or bend the rod. The amount of force we apply varies depending on several conditions, but the HOW we apply force remains the constant. Once slack is removed, begin slow and smoothly accelerate to a crisp STOP at the end of the casting arc. For proper acceleration, remember:

Start Slow – Finish Fast

Straight Line Path

To sum this up in one sentence: the line will follow the path of the rod tip. With no slack in the system, we smoothly accelerate to a stop, and as we load the rod, it bends. The bend in the rod makes up for the circular rotation created when we move the rod from forward at and angle to overhead and slightly past vertical.

If we don’t accelerate smoothly and we apply the improper amount of force, the rod will bend either too little and create a convex path or the rod will bend too much and create a convex path. The convex path of the rod tip creates a wide loop, which is generally inefficient (though it has its proper applications). The concave path of the rod tip creates what is called a tailing loop, where the fly leg dips below the rod leg, and creates wind knots (aka bad casting knots).

With the proper acceleration, we create narrow loops that are 4′ wide or less with parallel rod and fly legs.

Straight Line Path


Casting Arc

 If we begin the cast with our forearm, we call that translation. As we continue to accelerate, we rotate with the wrist. Translation and Rotation are what make up our Casting Arc.

Flat First – Rotate Late

The important thing to remember about the casting arc is that it should match the amount of line we have outside the rod tip.

Short Cast = Short Line = Smaller Casting Arc, Long Cast = Long Line = More Casting Arc.

Casting Arc

Pause

At the end of our Casting Arc, we finish accelerating with a crisp STOP. This stop is what forms our loop. At this point, we need to pause to let our loop unfold. The duration of the pause will vary with the length of the line. A trick to pausing for the correct amount of time is to think of your cast in 180 degrees. Just before the line straightens on your forward cast, you can begin your back cast. Unless you are shooting large amounts of line (we’ll talk about that more in the future) the pause will be the same on back as it is in the front.

If we pause too long, our line will end up in the water behind us or on the ground. If we don’t pause long enough, we hear a whipping sound. If you are dead set on idolizing Hank Patterson, use a short pause and “Snap It!”

Short Cast = Short Line = Short Pause   |    Long Cast = Long Line = Long Pause.

Practice and master the basics. They are the building blocks for all of the casts you can make with a fly rod. If you are having any issues with your cast, be sure to start with the 5 Essentials to begin to correct your cast.